1. Click on Blocks at the top right corner of the screen to switch to the Blocks page where you will program your app.
2. Click on Select_BT and drag and drop the “when Select_BT.BeforePicking do” block into the viewer. Then click Select_BT and drag and drop the “set Select_BT.Elements to” block inside the previous block. Then click on BluetoothClient1 and drag and drop “BluetoothClient1.AddressesAndNames” at the end of the previous block.
3. Click on Select_BT and drag and drop the “when Select_BT.AfterPicking do” block into the viewer. Then click BT_Name and drag and drop “set BT_Name.Text to” inside the previous block. Then click on Select_BT and drag and drop the “Select_BT.Selection” block at the end of the previous block.
4. Click on Connect_BT and drag and drop the “when Connect_BT.Click do” block into the viewer. Then click on BluetoothClient1 and drag and drop the set BluetoothClient1.Secure to” block inside the previous block. Then click on BluetoothClient1 and drag and drop the “call BluetoothClient1.Connect address” block at the end of the previous block. Then click on Select_BT and drag and drop the “Select_BT.Selection” at the end of the previous block. Click on Control and drag and drop an “if then” block below the previous blocks. Click on BluetoothClient1 and drag and drop “BluetoothClient1.IsConnected” in the if section of the if then block. Click on Notifier1 and drag and drop the “call Notifier1.ShowAlert notice” in the then section of the if then block. Click on Text and drag and drop an empty text box at the end of the previous block and type “Connected” in the text space. Click BT_Name and drag and drop the “set BT_Name.BackgroundColor to” under the previous block, still within the then section of the if then block. Click Colors and drag and drop the green block at the end of the previous block.
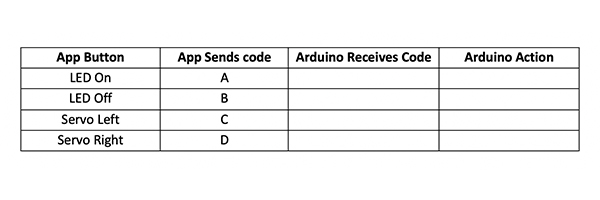
5. Click on LED_on and drag and drop the “when LED_on.Click do” block into the viewer. Click Control and drag and drop the “if then” block inside the previous block. Click BluetoothClient1 and drag and drop the “BluetoothClient1.IsConnected” block into the “if” section of the “if then” block. Click BluetoothClient1 and drag and drop the “call BluetoothClient1.SendText text” block into the then section of the "if then" block. Click on Text and drag and drop an empty text box at the end of the previous block and type “A” in the text space.
6. Right-click on the “when LED_on.Click do” block and select Duplicate. Change “LED_on” to “LED_off” and change “A” to “B”.
7. Repeat step 6 two more times, changing “LED_on” to “Servo_left” and “Servo_right” and changing “A” to “C” and “D”.
8. Record the button actions you just created in the second column of your notebook on page XX or on your Bluetooth Communication Worksheet like below:
If you are demonstrating for students how to build these blocks, we recommend printing the final blocks as guiding notes to use as you are building. We also find that it is easy for students to fall behind when building block code, so be sure to go slow and have a system to ensure that everyone is finished before moving to the next step.
Periodically circle the class to check each computer and help build code for those who are falling behind. If you are limited on time or are worried about students’ progress with so much code, you could complete some of the app before students’ arrival. We recommend completing steps 1-5 and then letting students complete the button actions.
If you decide to use this method, you will also need to complete steps 1-3 and 7-8 of the app design and make sure that students do not delete any of the components or blocks that you have pre-created. To easily share an app in progress, click Projects and select “Export selected project (.aia) to my computer”.
Load the project onto a USB drive and open it on each computer or email it to students and have them open it in App Inventor.
Having trouble finding some of the blocks needed to build this code
- Read through the steps again to find where to click for each block and be sure to scroll down to see all available blocks for that component.
- Watch the video and pause as needed to find the location of each block.
- Use the following completed code image to help build all necessary blocks. Note that the first part of each block, except for the “if then” block and text blocks, tells you which component to click on to find that block.